Wednesday, August 13, 2025

Deck Day 3

I got a little sidetracked this morning. I ended up cleaning the rain gutters with a broom, a vacuum, and a bucket. I got motivated to do this yesterday afternoon when I was working on the drain spouts. Over the years, the gutters were filling up with debris and I figured why not spend some time to clean them up.

But then I got back to work on the deck. Today I moved five more wheelbarrows of dirt. I also graded the surface to support drainage when it rains. I repositioned all of the grating stakes and measured out the required depth using my depth tool set to the size of the beams and joists (see photo below). I figure as long as the Earth is a couple of inches lower than that, I'll have enough ventilation and drainage under the deck. It looks like we're good to go!

 The five wheelbarrows of dirt from today plus the nine from yesterday equal 14. Curious as to what that looks like?
Q: So what can you make with 14 wheelbarrows of dirt? I've built enough dirt jumps to know exactly what that means. You can make something like this...
RIP Barnard Jumps circa 2003. The dirt lot is now a bunch of condos. Nothing is consistent but change.

Tuesday, August 12, 2025

Deck Day 2

Today I moved nine wheelbarrows of dirt to the backyard. I completely overestimated how much dirt I had to move. After that, I rerouted the rain gutter downspouts. When first installed, there was one spout that handled all the water off of the roof of the house and another spout 4 ft away that handled the water that landed on the porch deck. To make the corner of the porch a little more clean, I rerouted the porch deck downspout into the one for the rest of the roof. I also dug a trench and rerouted some irrigation lines I found. The irrigation lines used to come up near where the corner of the deck will hebut that will be inaccessible once the deck is complete so I move them towards where the front of the deck will be so that I could use them in the future if necessary. Future proofing!

I also climbed under the house to verify where the gas lines and the water lines enter. The good news is I confirm the gas line enters near the gas meter and will not cause any problems. The bad news is I discovered the water line enters the house 10 ft West of where the water line leaves the street. In other words, there's a bend or a couple turns in the blind somewhere and I have no idea where they are. I'll have to dig carefully.

Monday, August 11, 2025

1975

 I experienced my first day of school in 1975. Since then "the first day of school" has been part of my life. Either as a K-12 student, a college student, or an educator...I have always been at a school on the first day of school....until today.

Today is the first "first day of school" since Michelle and I retired June 30, 2025. We made a point to celebrate this event by being somewhere else than San Diego on the first day of school. We chose Ponte, our favorite winery in Temecula, Ca.

We drove up to Ponte on Sunday afternoon. We spent the day in the pool and enjoyed the warm evening around a fire pit gazing at a full moon.


On Monday morning we woke up without using an alarm and opened the doors of our room to enjoy the beautiful view.


We watched a brown pelican swim around the pond catching frogs for breakfast.


After that, we walked over to the restaurant to enjoy a breakfast. I had huevos rancheros and a bloody mary.


Michelle and I worked 32 years in SDUSD in order to be able to retire while young enough to enjoy life. Today was a wonderful beginning of the next chapter of our lives together.


Saturday, August 9, 2025

Deck Day 1

 You can call this "day 1" if you don't count the day I spent removing five trash cans full of plants and the time I have spent drawing diagrams of the deck and visiting Dixieline Lumber to talk to people about wood and construction methods. But since I purchased some concrete forms today and got to work moving dirt then I considered this Day 1. 

I need to grade the ground prior to digging holes for the concrete footings. We live on a slope and I need to make sure water won't pool under the deck. I pounded some survey stakes into the ground and ran string around to verify how far the deck will sit off the ground once complete. The west side will be 20 inches off the ground and the east side will be 6 inches above grade.


Saturday, February 3, 2024

New Bike Day

 I bought my first mountain bike (Santa Cruz Bronson) in 2017. 1264 miles and tons of fun later I found a new ride. I’m in love with bikes and can’t wait to see where my Pivot Mach 6 takes me.


Saturday, November 18, 2023

Been Awhile

Spent some time letting my ankle heal. That included multiple visits to the doctor and some "scooter" time but the good news is I'm back at 95%. See below for my most recent visit to Santa's Village.


Friday, May 27, 2022

Back Seat Delete Complete

I hurt my ankle jumping my bike back in November 2021.


At first I thought it was a bad ankle sprain. Turned out to be a little more, but that is a different story. The bottom line was I had to find something to do to occupy my time for 12 to 14 weeks. I decided to remove the backseat from my truck and replace it with a rack system for storing camping supplies.

The first step was to remove the back seat. I quickly sold it on OfferUp. The next step was to build a frame for the rack to bolt to. I purchased metal bars called Unistrut from Home Depot and used my chop saw to cut them into the appropriate lengths. I designed the system to bolt into the stock mounts used by Ford to mount the original seat. Unistrut comes with an adjustable bolt system to connect pieces together for the purpose of forming various shapes. 

The next day I drove the truck to the store and was surprised to learn how loud the engine and exhaust noise was in the cab. Apparently the back seat also served as a sound baffle for noise entering the cab from the back wall of the truck. In addition, the vents in the photo above (which are required for the air conditioning system to work properly when the windows are rolled up) allowed additional sound into the cab. The noise was more than I wanted to listen to on long drives so I decided to install sound deadening material throughout the cab.

Basically this involved removing the front seats, existing carpet, and stock sound mat that came with the truck. Next I installed 1/4" thick rubber sound deadening sheets that cut to fit with a box knife. I covered the entire floor with sheets with a silver backing. I purchased sheets with a black backing for the back wall for aesthetics. Once I completed this task, I reinstalled the original sound mat and carpet. The decrease in sound was incredible!

The next step was to paint the metal frame black and permanently install it in the truck. 

I mentioned the floor mounts were designed to bolt into the existing holes for the stock seat. The back mounts were bolted to the cab of the truck using "rivnuts". Rivnuts are basically brass nuts with a base that mushrooms out when installed with a rivnut tool.

Simply drill a hole in the cab, place the rivnut in the hole, then use the rivnut tool to mushroom out the backside. Once complete you have a threaded hole you can screw bolts into.

The sound deadening material really helped muffle the engine and exhaust noise but the black vents in the back were still allowing sound to enter the cab. I was able to confirm this by temporarily taping over the vents with cardboard.

I decided have a vent cover fabricated for the purpose of deadening the sound. I found a student in the engineering program at my school who enjoyed playing with auto-cad software and asked him to design a vent cover for my truck. 

He built me two covers made from plastic. They were printed on a 3D printer in his classroom.

Notice how the final version has foam deadening material in it to help absorb more sound. I had the student install the vent covers in the back of the truck. They look and work great!

The next step was to build the benches themselves. I researched the dimensions for military "molle". Molle is a belt/loop system for attaching various items to each other. I designed two rack plates which conformed to the molle pattern. The back bench is below.

The black squares were left where the mounting hardware will attach the rack to the frame. The bottom bench has a slightly different molle pattern.

Notice how every other row of holes was removed. This design allows the bottom to hold additional weight. I want to carry a DC refrigerator and possibly a spare tire in the back of the cab. 

I purchased two pieces of "starboard" from a local plastics company. Starboard is a plastic material that comes in 4' x 8' sheets. You can use basic wood working tools to cut and mold it. Basically it behaves like plywood but doesn't rot or splinter. Fishing boats have tackle boxes made of starboard.

I partnered with a teacher at a local high school who teaches an industrial technology class. I emailed him my design files and dropped off the starboard sheets at his classroom. He used a giant CNC router to cut the holes in the plastic. See below for the test fit of the back panel.
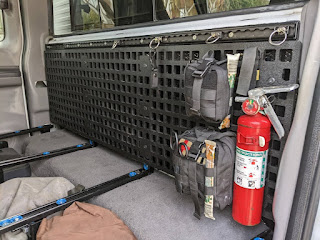
Notice how I am able to connect a fire extinguisher and various bags to the molle pattern. This provides a lot of flexibility regarding how I store tools and equipment. The final install looks nice.

The entire back of the cab can be loaded with equipment and tools. 

The bags next to the fire extinguisher hold flashlights, tie downs, rope, some tools, gloves, and a first aid kit. The space between the bottom panel and the floor of the cab is used to store additional tools, tow straps, jumper cables, and equipment. 

The refrigerator straps down on the passenger side of the cab. There is a small access port near the back of the refrigerator for me to run the power cable out of the cab of the truck. Next week I'll connect this cable to the electrical system existing in the camper. Eventually the solar panels on the top of the truck will power the refrigerator 24/7.

I'm happy with how the project turned out. It took longer than I thought but the end product looks good and works well. My foot is all healed up and I'm ready to continue surfing and bike riding. 

Friday, November 26, 2021

New Wheels

I've been laid up recently with a bum ankle. Lots of sitting around and doing odd jobs and tasks that needed to be completed. One exciting piece of news was I upgraded the wheels on my truck. I got rid of the alloy wheels from 20 years ago and picked up some new methods. Check them out!

Sunday, April 11, 2021

Busy Weekend

Getting ready to go back to work. I went for a 20 mi bike ride yesterday then came home and ate some lunch. After that I went out for another 10 mi. Today I did some gardening in the backyard. Pulled six trash cans worth of weeds and trash. Afterwards I sat on the patio and stared at the weather satellite antenna. Decided to see what the latest weather image was. Posted photos of everything below. Check them out.

Saturday, January 18, 2020

New Flex

I picked up my new board from Steve's house this morning. It's a 6' 3" swallow tail that is somewhere in size between an older 6' 2" pendoflex I have from 12 years ago and a 6' 3" Mitsven I had shaped a few years ago. I took it for a surf this morning and caught a few fun waves. I love how it paddles and it definitely has some zip. I plan on trying it out tomorrow when the tide is in. Check out the laminate between the fins! Its the same graphic I posted on the blog awhile ago.

I love the board. Thanks Steve!